

Holy bubbles batman! I have my sm100 plumbed off my return on top of my tank and dumping straight into my display. The bubbles are crazy. I figured they would be though. How are people dealing with this?
Sent from my SCH-I500 using Tapatalk

Holy bubbles batman! I have my sm100 plumbed off my return on top of my tank and dumping straight into my display. The bubbles are crazy. I figured they would be though. How are people dealing with this?
Sent from my SCH-I500 using Tapatalk
A few ways:
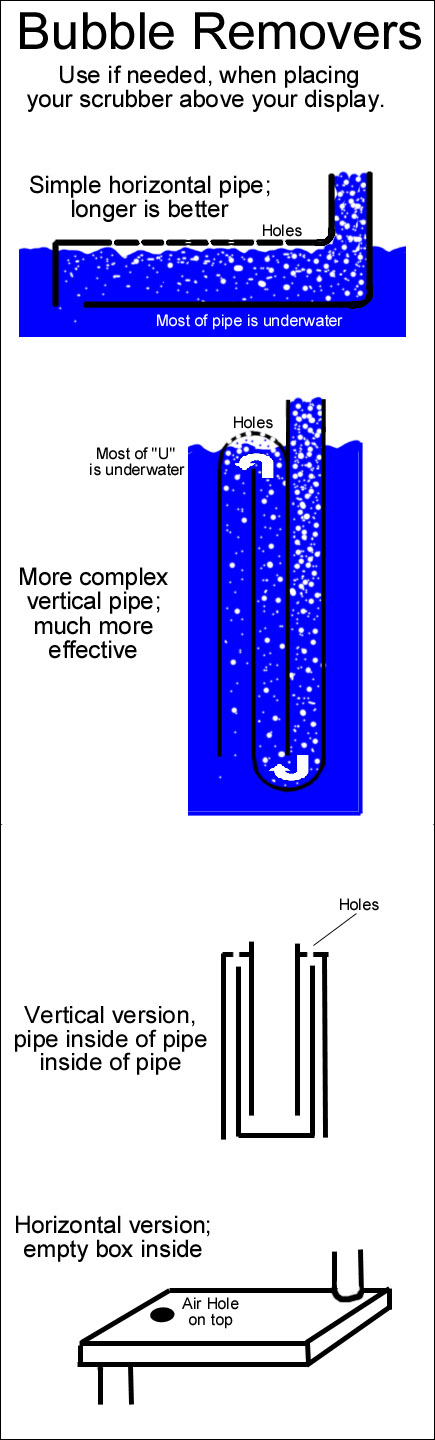
The idea is to slow the water down so the small bubbles have a chance to go up. With your wide tank, and with the scrubber on the right, you might do a long pipe across to the left. Or go down and back up. Get some cheap white pvc and get it working, then complete it with nice black: http://savko.com/PartList.asp?pgid=4&ptid=18&pid=146
Of course you can feed it into some floss or foam, but then you lose your pods, and you build up waste.
Installing above the display is a more advanced way, and the highest-performance way, but it does take a bit more engineering.
It's worth the extra work to me to keep the pods. I'm not about to add any mechanical filtration. As it sits now, the unit is sitting on the rim of the tank. Do people usually mount them a little higher?
I the unit is dumping between the glass and the overflow. I have about 6" of space.
Hmm... I may have a cool solution that combines the vertical and the horizontal pipe.
Come out of the unit down about 1 foot then curve back up to next to the glass up to the surface from there turn and run at the surface to the front of the tank. That should do it and not be too obtrusive.
The problem is the vertical drop. I've tried many things, except the "more complex vertical pipe". I would try that one. It's essentially an up/down made with PVC pipe. But I'm betting it wont' work that well, the problem is that you end up with tons of microbubbles that just push through with the flow. I tried the first one and it failed miserably. You need a dump chamber that is deep enough to stop the bubbles from travelling with the water. That is the key.
Plus as the air gets trapped in the down flow section of the pipe, it will blow out huge bubbles. This may not be as much of an issue if you make the pipe extend down a ways into the tank.
Right now I have mine drop out into a DIY chamber with bio-balls to stop the water from impacting the surface. It does a decent job, but far from ideal.
See it at 5:30 in this vid
http://www.youtube.com/watch?v=LrNvqtk7t18
The trick is to slow down the water. So the wider the passage, the slower it will go.
I'm going with a version of the pipe in pipe in pipe. And I'm going to glue the 2nd pipe to the bottom seal and drill holes all around the bottom 3" or that pipe then back up and down like pictured. That will slow the water down considerably won't it? Then I can use an over sized pipe for the last down so more bubbles can float up easier.
1" out of the unit down 14" or so. A 1.5" back up and then use a 2.5" for the last run down. That will get rid of enough if not all. The bubbles I'm getting all pop quick, I'm not getting micro bubbles.
Speed is just a function of diameter. Wider means slower. And emember that if some algae lets go from the scrubber, it will need to be able to get through the pipes.
Try it before you glue it to the scrubber. It's a friction fit so just push it in and turn it tight. Matter of fact, if it just drains into your display, you may not have to glue it at all.
Grim I just saw your post on the UAS thread. when you get a chance, take some pics of your current setup and post them here. I have learned a few things in testing the flow of the e-shine scrubber I built and might have some insight for you.
The first thing I discovered is that the flow rate through a 1" bulkhead: in order to keep the box from filling up, the drain line must be terminated below the water line in order to create a siphon effect. If you insert an airline into the drain on the inside of the box, this will silence the drain but cause it to run slower, filling up the box. This is what i consider to be the dirty little secret of the large (wide) single drain scrubber. The result is that the water flow is so rapid and turbulent that you get the bubbles you are having trouble with.
The other issue is that you are pushing 700 GPH through a 1" bulkhead and you basically have to. In order to take care of the microbubbles, you need a relatively large box underneath it that slows the overall flow of the effluent water down significantly enough such that the microbubbles will rise to the surface. Usually this means that you either need a very wide open box with a drain at the bottom and a set of baffles of some kind, or a very long wider diameter pipe that is open at the bottom, probably a 3" PVC pipe, and one that goes all the way to the bottom of the tank. This pipe would be above the water surface and the drain would sit in it, the 3" pipe not bonded to anything. You could just cut it to length and set it in the tank at a slight angle, like in the corner slanted up to the scrubber drain, then it would be held in place by the corner of the tank and the bulkhead/drain. I don't know if that makes sense the way I wrote that. Anyways having it at an angle would help also because the flow would want to go down one side, which leaves the other side having a calmer area for the microbubbles to climb. You would also cut a strip of plastic canvas to insert down the middle of the pipe to create a separation barrier to let the microbubbles through but help prevent them from getting caught up in eddy currents within the pipe, which would result in them getting sucked back into the high water flow. This plastic canvas will need to be rinse off weekly with your cleaning however. I use a "basket" of the #10 mesh (10 holes per inch) in my setup to block the microbubbles (it works VERY well by the way) and it is all brown and slimy by week's end
The other solution is to drill the bottom of the box and put in a second (or even third) bulkhead. This will cut the flow through the bulkhead down and reduce the turbulence (and noise). Drilling 1/4" acrylic is rather simple and this might be your best bet. Just get an appropriately sized bi-metal hole saw. Get one with a center bit, pre-drill the pilot hole without the hole saw attached, then drill the hole. If you want more details on how to do it without cracking the acrylic I can talk to you on the phone, it's a cinch done right. I can even make a video of how to do it if you like. However this will likely not completely eliminate the bubbles, but it would reduce the turbulence enough I would think where a smaller in-box blocker would work.
What I did while I was running my setup on top of the tank was I had a "chamber" (if you want to call it that) that was filled with bio-balls. This broke the fall of the water and did a very good job of stopping bubbles. The drawback again was that the bio-balls built up an algae sludge from the effluent (I had a dino issue, no tank surface skimming) and it would clog up and overflow so I had "bypass" slots in it. but with the tall tube idea, you could throw a few bio-balls in there to just float and roll around and these would cause the bubbles to coagulate into larger bubbles which would have an easier time of rising to the surface in the 'slow water' area within the pipe.
Anyways, I hope this gives you a few ideas. Might not look pretty but one of these or a combination / permutation of these solutions I would think would do the trick.
I have finally decided to pull it off the top of the tank and give it it's own tank to dump in. I plumbed in a 40 breeder and ever since I haven't been able to get enough flow to the scrubber and the bubbles got worse in the process. So I finally decided to re-plumb and have the 40b overflow into a old custom 30 gallon acrylic that is 30" tall. I'm going to put a water blaster 5000 in the bottom to run just the scrubber over that tank and then have it overflow back into my sump. That will finally give me a proper amount of water flow through the scrubber, totally solve my bubble problem and give me an extra 25 gallons or so of water volume.
Not to mention a place for some live rock a place for pods to grow. All good things.
I'm actually thinking about running the effluent line of my new CaRx system into that tank as well so the algae scrubber can take care of the ph and any excess co2 that may accidentally leak for me!
Sound like a good plan? (I run about 500gph through the 40b.)
There are currently 1 users browsing this thread. (0 members and 1 guests)
 Posting Permissions
 Reply With Quote