+ Reply to Thread
Page 3 of 3 FirstFirst 123
Results 21 to 29 of 29

Thread: 83g Rimless

  1. #21
    spideybry's Avatar
    Join Date
    Jan 2011
    Location
    USA
    Posts
    142

    Re: 83g Rimless

    Quote Originally Posted by Dallas reefer
    SUPER NICE!

    Hahaha. I cant help myself so.....

    Don't let RC guys know you have a sailfin in such a small tank. Lol. I got canned on that site cause I told them to leave a guy alone for having one in a 90. Haha

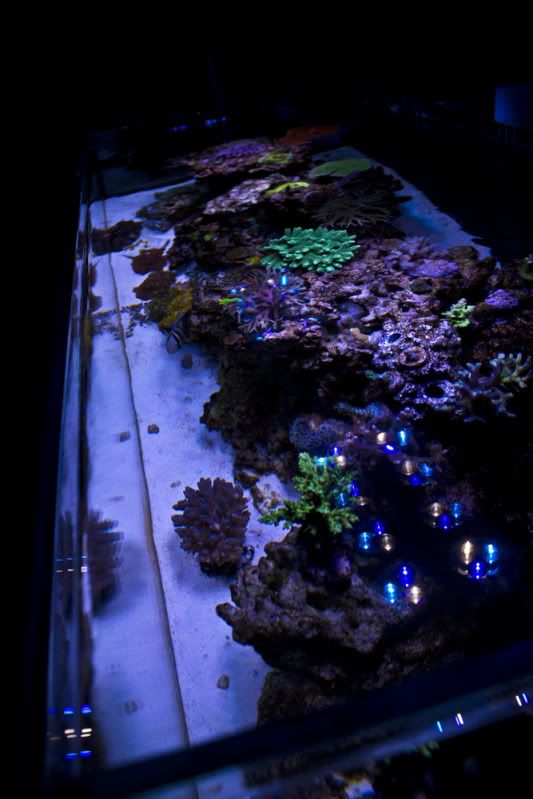
    I love you rock structure too.
    lol thanks Tang police doesn't scare me lol They see me rollin' they hatin....

    Quote Originally Posted by Dallas reefer
    Oh.... Who made that rimless? Ive been wanting one like yours since I sold my ATS 90.
    I got it from a place from Canada called Miracles Aquariums. They do nice work. There are a bunch of places that make tanks, just gotta look to see what works for you.

  2. #22
    Administrator
    Join Date
    Oct 2008
    Location
    Salt Lake City, Utah, USA
    Posts
    10,578

    Re: 83g Rimless

    If the inside of the drain is 1", it should not ever overflow unless you are doing more than 1000gph. Other than increasing the size, or adding a 2nd, you could add a small backup drain about 2" up, on the end. Just stick some vinyl tube in it.

  3. #23
    spideybry's Avatar
    Join Date
    Jan 2011
    Location
    USA
    Posts
    142

    Re: 83g Rimless

    Quote Originally Posted by SantaMonica
    If the inside of the drain is 1", it should not ever overflow unless you are doing more than 1000gph. Other than increasing the size, or adding a 2nd, you could add a small backup drain about 2" up, on the end. Just stick some vinyl tube in it.
    It is only getting that high because of the algae that accumulates and "strings up" if that makes any sense... Maybe I am putting too much flow through it... I do have a lot of turf growing on the upper side

  4. #24
    spideybry's Avatar
    Join Date
    Jan 2011
    Location
    USA
    Posts
    142


  5. #25
    Banned
    Join Date
    Aug 2010
    Location
    USA
    Posts
    2,710
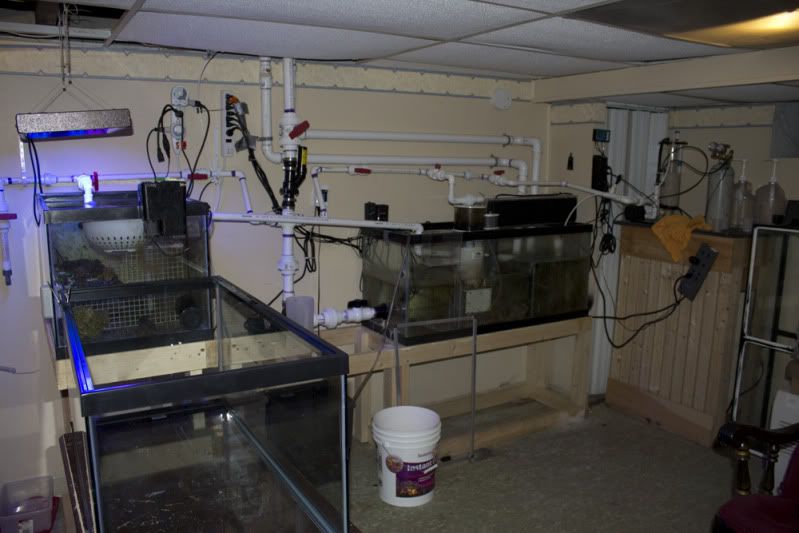
    I have had a few thoughts about how to remedy your issue with the drain. What I thought up (I can't take full credit for it, the idea was suggested to me by Chrissu a while back) was to make a false bottom in the scrubber. Put the drain in the middle versus the end, then make the box a little wider than the screen (or the screen narrower than the box) and bond a couple of strips of acrylic to the sides of the box, about 1" or so off the bottom (depends on the next step). The make a V-shaped channel out of 2 pieces of acrylic (or a thin piece that is heated and bent in the middle) that is about 2" shorter than the inner length dimension of the box such that it will hang on the strips in the previous step. The idea here is that the effluent from the screen is pushed to the ends of the box, then must travel back to the center to reach the drain. I haven't actually tried this, it's just on paper, but in theory it should work. The key is not to have the bottom point of the V or bend too close to the drain and reduce the outflow and also sturdy enough (thick) so that the drain can't suction it down and stop flow completely.

    Since the scrubber grows out long strands, these tend to find their way down the drasin and slow the flow and in your example, can block it. I haven't seen or heard of drain clogging happening that often, and it hasn't happened to me, but today when I looked at the scrubber (day 10) I noticed that the drains were hardly visible from the top, and I have 2 drains that are not directly under the screen (on the ends), so I know what you're concerned with.

    To make this work for your system, it would require sealing the hole in the bottom of the box, drilling a new one in the center, bending some 1/8" acrylic (not hard) or bonding some 3/16" or 1/4" (also not hard), and installing a couple of 1/4" x 1/4" strips to the inside of the box (not hard). You would also have to trim off the bottom of the screen and maybe about 1/2" to 1" off the sides. You might not have to do the sides, and wouldn't have to re-cut a slot tube if you just cut then at an angle starting about 1/4 of the way down from the slot.

  6. #26
    spideybry's Avatar
    Join Date
    Jan 2011
    Location
    USA
    Posts
    142
    Quote Originally Posted by Floyd R Turbo View Post
    I have had a few thoughts about how to remedy your issue with the drain. What I thought up (I can't take full credit for it, the idea was suggested to me by Chrissu a while back) was to make a false bottom in the scrubber. Put the drain in the middle versus the end, then make the box a little wider than the screen (or the screen narrower than the box) and bond a couple of strips of acrylic to the sides of the box, about 1" or so off the bottom (depends on the next step). The make a V-shaped channel out of 2 pieces of acrylic (or a thin piece that is heated and bent in the middle) that is about 2" shorter than the inner length dimension of the box such that it will hang on the strips in the previous step. The idea here is that the effluent from the screen is pushed to the ends of the box, then must travel back to the center to reach the drain. I haven't actually tried this, it's just on paper, but in theory it should work. The key is not to have the bottom point of the V or bend too close to the drain and reduce the outflow and also sturdy enough (thick) so that the drain can't suction it down and stop flow completely.

    Since the scrubber grows out long strands, these tend to find their way down the drasin and slow the flow and in your example, can block it. I haven't seen or heard of drain clogging happening that often, and it hasn't happened to me, but today when I looked at the scrubber (day 10) I noticed that the drains were hardly visible from the top, and I have 2 drains that are not directly under the screen (on the ends), so I know what you're concerned with.

    To make this work for your system, it would require sealing the hole in the bottom of the box, drilling a new one in the center, bending some 1/8" acrylic (not hard) or bonding some 3/16" or 1/4" (also not hard), and installing a couple of 1/4" x 1/4" strips to the inside of the box (not hard). You would also have to trim off the bottom of the screen and maybe about 1/2" to 1" off the sides. You might not have to do the sides, and wouldn't have to re-cut a slot tube if you just cut then at an angle starting about 1/4 of the way down from the slot.
    Thanks for the input. I have since slowed the flow down a good amount since I plumbed it into the system. Now the water doesn't accumulate as much as it used to. Though I wonder if I should turn the flow back up to get more 3D growth. If I do turn the flow up, this sounds like a sure fire way to help with the clogging.

    I am debating on waiting until the new style scrubber is released to upgrade. I am adding another 40g tank to the system so it should be an interesting addition.

  7. #27
    spideybry's Avatar
    Join Date
    Jan 2011
    Location
    USA
    Posts
    142
    Here is a video update

    http://youtu.be/1va1q2ooApY

  8. #28

    Join Date
    Mar 2010
    Location
    USA
    Posts
    289
    Very nice.

  9. #29
    kotlec's Avatar
    Join Date
    Nov 2010
    Location
    Lithuania
    Posts
    710
    Indeed

+ Reply to Thread
Page 3 of 3 FirstFirst 123

Thread Information

Users Browsing this Thread

There are currently 1 users browsing this thread. (0 members and 1 guests)

Posting Permissions

  • You may not post new threads
  • You may not post replies
  • You may not post attachments
  • You may not edit your posts