+ Reply to Thread
Page 1 of 4 1234 LastLast
Results 1 to 10 of 31

Thread: Helical Algae Scrubber

Hybrid View

  1. #1

    Join Date
    Jun 2015
    Location
    Canada
    Posts
    168

    Helical Algae Scrubber

    Concept:
    While researching commercial algae production for food, bio-fuel and waste treatment I discovered that many designs grow algae in tubes. These are generally clear acrylic tubes of various diameters and lengths exposed either to direct sunlight or purpose-designed artificial lights. As aquarists, we all know that nuisance algae grows in clear vinyl and PVC tubing even when light is less than ideal. So why not grow algae purposely in tubing exposed to optimum light to try to duplicate the commercial designs?

    Most of us don’t have space to set up a large array of straight acrylic tubes. So I thought maybe a coil of clear tubing contained in a bucket with an LED array in the center directed through the surrounding coil of tubing would duplicate the conditions. This tubing/light array could then be plumbed to a primary filter or directly to the aquarium tank.

    Build:

    22’ of 3/4” ID clear PVC tubing coiled inside a 5 gallon plastic bucket. Unions attach to both the input and output so the bucket can be disconnected from the rest of the filtration system. In my case, that is an MBBR in a 10 gallon Brute garbage can. If you haven’t already done so, you can see both of my MBBR filters here:

    http://algaescrubber.net/forums/show...r-combo-filter

    You can google “MBBR” to find out more about them if interested. They were developed for small aquarium use by the guys at Tyne Valley Aquatics, who seem to have rebranded themselves as Filter Pro, specializing in filter media:

    http://filterpro.co.uk/

    I bought 25' of 3/4" clear PVC tubing and prior to doing anything else with it, I pushed a Dremel 3/4" wire brush through it 12 times to roughen the surface. After each of the last 6 pass-throughs the brush had an attached ring of plastic fluff, so I conclude this was successful. I then determined that only 22 of the 25' of tubing was usable and cut it. A 3/4” ID tube of 22’ length has an inner surface area of 622 sq in. With my 80 gallon fish tank, this gives me 7 3/4 sq in per gallon of water, which seems adequate with a large margin of error based on the Scrubber Quick Guideline and assuming it’s basically a horizontal scrubber: http://algaescrubber.net/forums/show...E-SCRUBBER-FAQ

    Click image for larger version

Name:	DSC02528-800x600x72.jpg
Views:	403
Size:	70.0 KB
ID:	6369

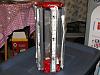
    I attached 1” ID PVC 60º elbows with male adapters to the ends of the tubing to connect to the input and output lines. The male adapters are 3/4” ID and they fit very nicely into the slip ends of the elbows. On the inside, I glued 1” ID tubing over the male threads with PVC cement. The 3/4” tubing slides into the 1” tubing, and is secured by cable ties. I put hard plastic tubes from a sponge filter drop tube into the 3/4” tubing ends so I could tighten the cable ties without deforming the tube. Note: this photo was made prior to final finish of the connections, so it shows the temporary stainless clamps and tape. The outside threads attach to 3/4" unions.

    Click image for larger version

Name:	DSC02536-800x600x72.jpg
Views:	346
Size:	86.0 KB
ID:	6370 Click image for larger version

Name:	DSC02538-800x600x72.jpg
Views:	492
Size:	77.4 KB
ID:	6371

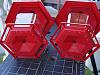
    I built an array of 6 LED panels supplied by ExpressionsLTD, using the base plates of 2 plastic humming bird feeders I purchased from Walmart to support them.

    Click image for larger version

Name:	DSC02454-800x600x72.jpg
Views:	353
Size:	65.8 KB
ID:	6372 Click image for larger version

Name:	DSC02457-800x600x72.jpg
Views:	474
Size:	62.7 KB
ID:	6373 Click image for larger version

Name:	DSC02458-800x600x72.jpg
Views:	352
Size:	62.5 KB
ID:	6374

    Here’s a view of the tubing and LEDs mounted in the middle of the bucket with a threaded rod through the bottom of the bucket to the top of the LED support. When this photo was made the unions were only screwed on loosely so I could remove the tubing.

    Click image for larger version

Name:	DSC02539-800x600x72.jpg
Views:	381
Size:	85.7 KB
ID:	6375

    My original plan was to paint the inside of the bucket gloss white and put a layer of aluminum foil between the tubing and the bucket walls to reflect light. Unfortunately, the paint scraped very easily and the foil was impossible to position without crumpling a lot. So I discarded this bucket and assembled everything in a new bucket in which I lined the inside with white bristol board.

    Click image for larger version

Name:	DSC02668-800x600x72.jpg
Views:	454
Size:	65.9 KB
ID:	6376

    The scrubber is powered by a Sedra KSP-2000 water pump with an airline blowing directly into the pump intake port. All the commercial designs I examined injected pure CO2 into the water to enhance algae growth. I don’t have a CO2 system and did not want to add to the initial costs of this experimental unit buying one. So I opted to blow plain air into the system instead. The pump sits on the bottom of the Brute. The plumbing:

    Click image for larger version

Name:	DSC02640-800x600x72.jpg
Views:	328
Size:	74.7 KB
ID:	6377 Click image for larger version

Name:	DSC02658-800x600x72.jpg
Views:	333
Size:	44.2 KB
ID:	6378

    Here’s a photo of air bubbles traveling through the tube. The flow is counter clockwise from top to bottom. The flow is sufficient to push the air all the way to the bottom and out the outflow port.

    Click image for larger version

Name:	DSC02660-800x600x72.jpg
Views:	380
Size:	58.6 KB
ID:	6379

    Here’s the unit in action. It has been operating since Jan01/16::6:00pm.

    Click image for larger version

Name:	DSC02670-800x600x72.jpg
Views:	398
Size:	53.0 KB
ID:	6380

    I welcome any questions and/or comments.

    Now to see if the unit will grow algae, if so whether or not it's sufficient to reduce nitrate and phosphate in the fish tank, of which there are an abundance.

    Water params as of Jan03/16:
    1. pH: 7.0
    2. Ammonia (NH3): 0.0
    3. Nitrite (NO2): 0.0
    4. Nitrate (NO3): 40+
    5. Phosphate (PO4): 10.0

  2. #2
    Administrator
    Join Date
    Oct 2008
    Location
    Salt Lake City, Utah, USA
    Posts
    10,576
    Will be nice to see how it does. Correct you do not want to use CO2 even if you have it.

  3. #3

    Join Date
    Jun 2015
    Location
    Canada
    Posts
    168
    Day 4

    For the past couple of days the tube has been getting less and less transparent. If you look at photo 11 of my initial post, you can see very clearly that the tube is completely transparent. Not so now, it looks cloudy, although I can't see anything specific. Could be microscopic air bubbles stuck in the roughed inner surface. Something to watch for the next few days through my 3" viewing port. Lights are on 24 hours and I will leave them on for at least a few more days to see how it goes.

    I bought a 3/4" ball valve to use as a flow control if it begins to look like the flow through the tube is too fast for the algae to grab on. I also bought a genuine J-tube to replace the return plumbing. I'll be installing that in a day or two.

  4. #4
    Administrator
    Join Date
    Oct 2008
    Location
    Salt Lake City, Utah, USA
    Posts
    10,576
    Some materials will haze up with the light.

  5. #5

    Join Date
    Jun 2015
    Location
    Canada
    Posts
    168
    Quote Originally Posted by SantaMonica View Post
    Some materials will haze up with the light.
    Thanks, it's clear PVC tubing. As noted in my original post, I ran a Dremel wire brush though the tube a dozen times. Not surprised something microscopic might end up in those micro-grooves. Hopefully, some will be algae spores.

    Curious: do you think stopping the waterflow and air for a day or two so the water just sits in the tube would help algae get established?

  6. #6
    Administrator
    Join Date
    Oct 2008
    Location
    Salt Lake City, Utah, USA
    Posts
    10,576
    Not at all.

  7. #7

    Join Date
    Jun 2015
    Location
    Canada
    Posts
    168
    Day 6 (Jan07/16)

    Algae has started to grow in the tubing! It starts as a small spot and then slowly grows a tail. Through my viewport I can see two fairly well developed filaments waving around in the flow (one is about an inch long and about 1/8" thick already, the other about 1/2" long and about 1/16" thick), a much smaller filament (1/8-1/4" long single strand) and two or three more spots. Quite interesting. I've been watching these off and on yesterday and today.

    Jan08 output filter sock:

    Click image for larger version

Name:	DSC02673-800x600x72.jpg
Views:	343
Size:	35.6 KB
ID:	6392

    This is starting to get exciting!
    Last edited by amwassil; 01-08-2016 at 07:48 PM. Reason: add photo

  8. #8
    Administrator
    Join Date
    Oct 2008
    Location
    Salt Lake City, Utah, USA
    Posts
    10,576
    Fresh or salt?

  9. #9

    Join Date
    Jun 2015
    Location
    Canada
    Posts
    168
    Fresh.

  10. #10
    Administrator
    Join Date
    Oct 2008
    Location
    Salt Lake City, Utah, USA
    Posts
    10,576
    It will readily grow in there then.

+ Reply to Thread
Page 1 of 4 1234 LastLast

Thread Information

Users Browsing this Thread

There are currently 1 users browsing this thread. (0 members and 1 guests)

Posting Permissions

  • You may not post new threads
  • You may not post replies
  • You may not post attachments
  • You may not edit your posts