+ Reply to Thread
Page 1 of 4 1234 LastLast
Results 1 to 10 of 35

Thread: New Design "Victory Scrubber Scrump"

  1. #1

    Join Date
    Sep 2009
    Posts
    81

    New Design "Victory Scrubber Scrump"

    Hi Guys,

    I have been working on a new hybrid horizontal/vertical ATS design for a scrubbing sump... or a "SCRUMP" as I like to call it, if you will. I plan on producing these shortly, in order to take the place of my Vortex Needle Wheel Protien Skimmers which are being taken down from my site soon. Since I need to replace my water treatment products anyways, and I really like the scrubbers, why not offer the "Victory V Scrump" on my site? http://www.nautilusreef.com

    I have been running a version of ATS for about 2 mos, and have been skimmerless for 4weeks now, and am very happy with the ATS concept and performance so for. I have been running my prototype Victory Scrump for about 3 weeks now to prove the concept and it's working VERY well. (Pictures/diagrams coming... see below) My corals are healthier than EVER, Two of MY RIC's that were dying going clear, are now SPLITTING? after removing the skimmer? Im amazed actually at how well my other softies are doing too. In my case, I might not be typical though, as I think i was OVERSKIMMING my tank with my larger skimmers i build and sell removing the good stuff with the bad Having studied ATS for awhile, I like the features that a Vertical Screens offer, (double sided very good use of space) but I dont like the requirement of lighting it from BOTH SIDES. The HORIZONTAL method is less efficient use of space (one sided) but it allows for good cascade of the flow, different water spray options and design options, and (I think) better lighting options, which is being able to successfully light it from above vs the sides...

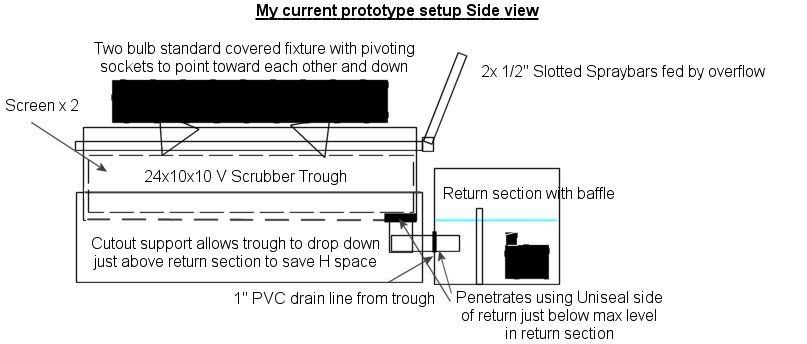
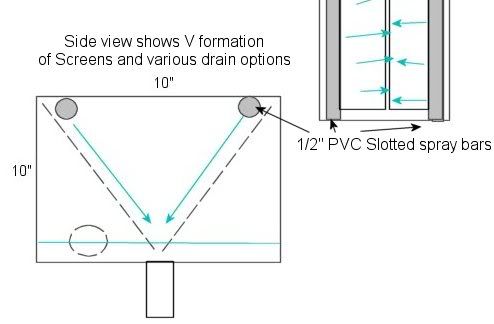
    I think I have solved this problem by coming up with the "Victory V Scrump" A Hybrid Design/method for the placment of the screens... Place the screens ANGLED inwards in V shape in a long trough along each side With lights placed ABOVE them. This is why I call my design the "VICTORY Scrubber Scrump" I was trying to figure out a way to maximize surface area, and I came up with the "V" shape of the screens along the sides of the trough, this utilizes EVERY inch of the trough and sheets while still being able to light it from above like a horizontal scrubber. The trick was to figure a way to allow lights to be placed ABOVE them without having to have them on each side like a TWO sided scrubber. I think I found it with the "V" design. The V shape placement of the screens allows for large sheets to be placed along the full 24" of the trough, but angled INWARD towards the center of the trough, which does two things..

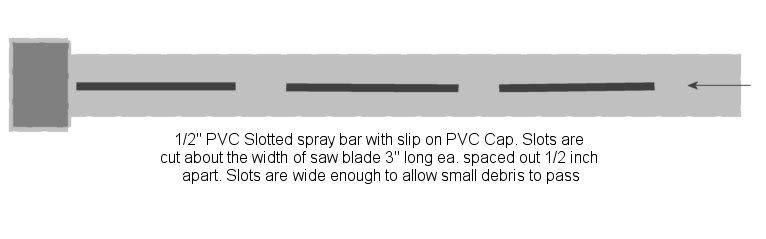
    1. The angled sheets are semi-horizontal in that, the water sprayed from above cascades downward across the sheets face, which meanwhile are exposed to lighting on the entire surface area. The sheets DO NOT have to be placed inside the PVC pipe to support them or power them, they rest on the sides of the trough the slotted spray bars trickle down over them, to clean them is a breeze, simply tilt them out and back in for cleaning.

    2. It allows the lighting to come down from ABOVE vs the sides. The V shape angles and exposes the screen surface material towards the lights even when the lighting is placed directly above them, they still get excellent lighting coverage.

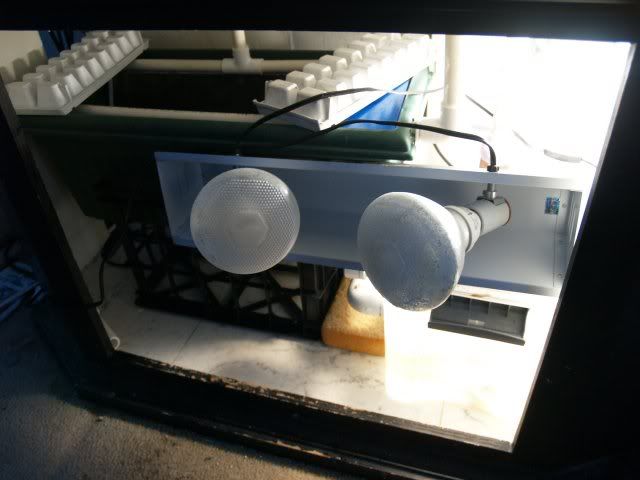
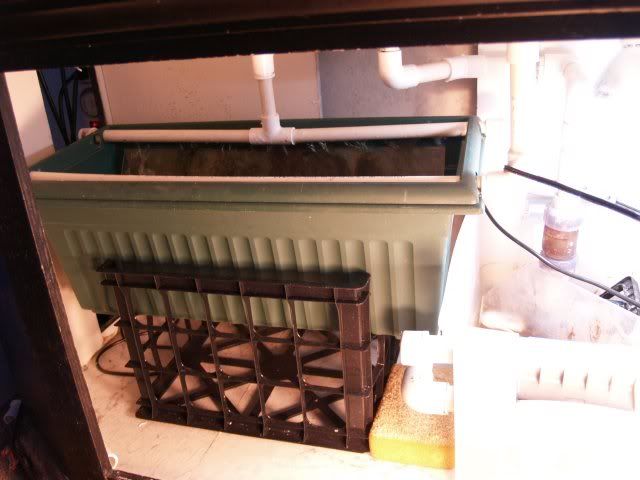
    For the Prototype trough I just purchased a flower box and modded it supported it with cutout plastic eggcrate to lower it, (my stand is short) and used Rubbermaid container for return, and fixture is Reptile light with two angled screw in bases with 2x 25w CPF floods


    Here is how I setup my current prototype (will get some pix up shortly) Im using 2 ea 25W Floods in fixture


    here's more


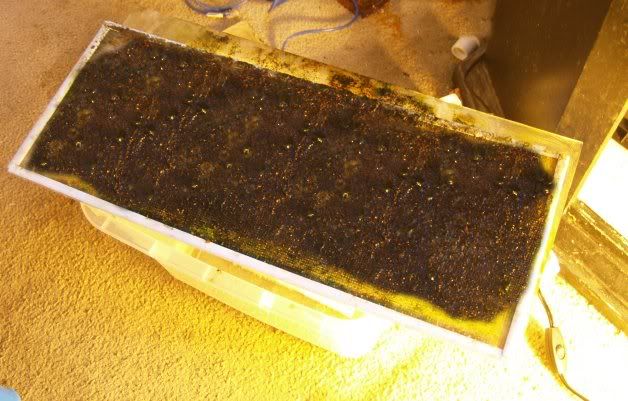
    With light removed looking at one of the screens and PVC plumbing


    One side of 20"L x 8" H mesh screen ready for first cleaning after 12 days

    My Scrump Design does a few things I think are critical to success... It has large surface area for the ATS sheets, its easy to acess/clean, and be lighted with simple lights or with a variety of avaialable fixtures, with one huge difference, it will NOT be lighted from the sides but from ABOVE. It can be powered (as in my case) from the overflow(s) or an external pump.

    And most importantly to me the EFFICIENCY of this Hybrid ATS scrubber: With this Design: The surface area of screens with this V design is = to that of a Vertical double sided Scrubber going the length of the trough

  2. #2
    kcress's Avatar
    Join Date
    Nov 2008
    Location
    Santa Cruz, California, USA
    Posts
    458

    Re: New Design "Victory Scrubber Scrump"

    I'd call it a V-Scrump myself. "Victory" = confusing.

    Pictures man - where - are - the - pictures?

  3. #3

    Join Date
    Sep 2009
    Posts
    81

    Re: New Design "Victory Scrubber Scrump"

    For production MODEL: It is a very simple design that consists of two modular acrylic rectangle tanks: a long 24" trough and a return section with plumbing that connects them both. They are seperate and can be moved around. It utilizes TWO large screens on each side to form the "V" inside the trough. The screens in my prototype are 20"L x 8" H, and placed on each side below the spray bars, these will be the same. I used acrylic sheets for support behind the mesh, with the canvass mesh epoxied to them which is roughed up using hole saw for the surfaces (for now). The light fixture I plan on offering will rest on top of the trough, and will be the standard reptile hood W/ 2-CF Floods with reflectors, or 24" HO- T5 hood.

    Trough:
    The trough section which holds the two ATS scrubber sheets in a "V" shape, can be set up in a VARIETY of ways under or out of the stand, depending on your avaialable space. The Scrubber section is a trough like acrylic tank measuring 10x10x24", which has two 1/2" Slotted spray bars (pics coming ont this too) with slots spaced out about 2" apart on each side. It has a 1" PVC Drain underneath/or on end (depending on setup) using a UNISEAL on it, this can be centered or placed at the end of the Scrubber trough for drainage back into the return section. The trough will have a small space saving Acrylic single support on the NON Return Side End to hold it up in place. The other side of the trough will either have ANOTHER centered support (for lower installs) or REST on top of the return section keeping that end up in place, The trough section will then dump into the movable modular RETURN section which is another acrylic tank measuring about 10H x 12W x 16L. The return section will have an adjustable baffle to keep MB away as much as possible from return pump.

    Modular Return:
    One way to setup the V Scrump when WIDTH of stand is issue but you have H, is the trough sits ON TOP OF the return section allowing the return section to SLIDE under the trough to save space. (drain in center) this brings the end of the return to the end of the trough for space saving. Either way you choose, it drains INTO the return section using gravity. This is a good method for smaller WIDTH but TALLER stands which can accomodate a higher TROUGH section but not a LONGER Scrump. (see diagrams below). I find a lower trough is a better trough for access and cleaning/inspection and lighting space. (my stand could be taller). For Longer Width stands which are LOWER, the Scrump can be made with the drain line near the END or side end of the trough VS center so the Return section can placed at the end of the trough. Yet another even more space saving method which will LOWER the trough even more, is to slot the return section side that supports the trough, the width of the Trough, and then slide the trough partially into/above the return section thus lowering the trough and saving space. And finally the trough can be lowered to just ABOVE the return section with plumbing entering SUBMERSED below the top off level of the return section. (This is how I have my setup right now for the prototype.) I wanted to keep the trough lower for access and light space on top, but was concerned putting the drain line BELOW the water level in the return section might cause HEAD pressure and thus the trough would fill up and the balance between overflows and return would not be equal.

  4. #4

    Join Date
    Sep 2009
    Posts
    81

    Re: New Design "Victory Scrubber Scrump"

    For the production version everything will be acrylic and much nicer looking. I just made the prototype to TEST my theories and the idea.

    The SCrump idea is a very simple design that consists of two modular acrylic rectangle tanks: a long trough and return section with plumbing that connects them both some PVC spray bars, two long mesh screens, and finally a covered Light on top.

    Here are some drawings for some options for the produced modular design and other plumbing options.


  5. #5

    Join Date
    Sep 2009
    Posts
    81

    Re: New Design "Victory Scrubber Scrump"

    Heres a drawing of my slotted 1/2" Spray Bars which feed the trough on each side above each screen. Since I dont insert the screens into the PVC I came up with the slotted idea. I liked the drilled perforated HOLE spray bar idea and tried that, but I found the holes clogged too easily, and that type were also LOUDER than the slots. But I think they were best at covering the screens.

    In my prototype I am testing different bar connection methods. Right now, I feed ONE of my spray bars the end, and the other one in the middle with a T fitting to test how each method works.


    Drainage using overflow method to power it:

    What I found was that 1" Drain lines MUST be used if you plan on powering the Scrump with your overflows like I am, in order to keep the rate of flow constant and even from tank back to return section. Also the larger pipes move more water in greater volume and less speed= quiet. My main concern lowering the trough and thus having to feed the drain line it into the SIDE of the return section, was that the HEAD pressure created from the submersed drain line of the trough, from the RETURN section water levels, would not allow the GRAVITY flow from the TROUGH to keep up with the return pump thus filling the Trough, and raising the water level in the trough. (not ideal)

    However even using a 950gph return pump and a split overflows to power my Scrump, the trough itself stays just barely filled with water, keeps the drain inside it silent, and also keeps the cascading water off the screens flowing down into the water almost silent.

    IF you powered the Scrump with a pump vs overflows, keeping up with the overflow is not an issue, also if you have the H (i didnt) you can RAISE the trough up in the ONTOP of Return section mode and let gravity do its thing, spilling the water from the Scrump back safely/quietly into the return section without fear of backing up the drain line of the trough.

  6. #6

    Join Date
    Sep 2009
    Posts
    81

    Re: New Design "Victory Scrubber Scrump"

    For the prototype I purchased a REPTILE two bulb metal fixture. I liked this since it had Two sockets, you could angle them and it was the right size.

    Each socket/ light has its own power on off, and cords. I just leave them on and connect the fixture to a timer.


    Being able to place your lights ABOVE the ATS and even INTO it, if you want (using several straight down CF with no reflectors) give you a LOT of options for lighting the SCrump. Even small HO T5 low profile fixtures could be used as well, for this design, you will need about 24" of light fixture to cover the trough.

    I just used the Reptile lite with 3200K Floods, for the prototype. I think adding ONE more socket and combining the cords into ONE would be cool, or a HO T5 fixture for the final commecrial version. Since I plan on putting kits together for people I want to use pre-built UL fixtures for the kits no matter what type they are. (safe) and offer them choices. So far for the 24" Scrump the two CF Floods appear to be doing just fine, the light is spread very nicely in the trough, and it reflects all over the place since the bulbs are down into the Scrump slightly.

  7. #7
    kcress's Avatar
    Join Date
    Nov 2008
    Location
    Santa Cruz, California, USA
    Posts
    458

    Re: New Design "Victory Scrubber Scrump"

    Thanks for the pics!

    Looks well thought out. Innovative. Should work pretty well.

    I'd think linear lights would be superior to spots for that configuration. I'm having a hard time even imagining anything like a uniform light pattern with your configuration.

    Also I think your 1" drain is a disaster waiting to happen. You should consider a larger one or possibly a second one that is dry and only comes into service once the other is plugged - possibly both.

  8. #8
    Administrator
    Join Date
    Oct 2008
    Location
    Salt Lake City, Utah, USA
    Posts
    10,576

    Re: New Design "Victory Scrubber Scrump"

    Nice. Looks similar to Broder's.

    The surface area of screens with this V design is = to that of a Vertical double sided Scrubber going the length of the trough
    Correct. But remember it's getting half the light. A vertical has two lights, one on each side, so each side gets all the power of one light. With yours, there is just one light, that is shared by two screens. So with yours you'll need to double the wattage in the center (goal = 1w per gallon).

    I liked the drilled perforated HOLE spray bar idea and tried that, but I found the holes clogged too easily, and that type were also LOUDER than the slots.
    Also, drilled holes do not flow as much water as a slot.

  9. #9

    Join Date
    Sep 2009
    Posts
    81

    Re: New Design "Victory Scrubber Scrump"

    Quote Originally Posted by kcress
    Thanks for the pics!
    I'd think linear lights would be superior to spots for that configuration. I'm having a hard time even imagining anything like a uniform light pattern with your configuration.
    [color=#0000BF]Algeantor wrote: "Being able to place your lights ABOVE the ATS and even INTO it, if you want (using several straight down CF with no reflectors) give you a LOT of options for lighting the SCrump. Even small HO T5 low profile fixtures could be used as well"[/color]

    Agreed about the spots, pointing at each other and instered slightly down in there, light is going EVERYWHERE that I can tell.. but.. as you can see above, I mentioned the best method or another method using linear CPF, or T5 for this application is the way to go. I was for the proto, I was already planning on changing them out this week to 4ea LF's..similar to Broder's design. I was just being lazy and cheap for the short term proto I figured long term I will add two more smaller CPF spirals centered in that fixture extening a bit less INTO the trough, for a total of 4ea x 45W Linear's in their place of the two 90W floods, to run the proto long term, or until I find an affordable VIABLE 24" T5 fixture.

    Though i am getting good growth on the mesh screens with the two floods now, I suppose and and am sure it could be better. Also as I mentioned above, the endgame goal for the production model will be to power the Victory V Scrump with a single low profile 24" x 4 tube T5 HO fixture that would sit neatly on top of the trough, it would really be nice looking, and is the actually where I will probably end up when I offer them as a kit bundled together on my site. I like the idea of a lense protected light source where the bulbs/sockets arent directly exposed to splashing and creep as they are with open lights to the sides/near above/in the Scrump. And even though a T5 fixture will direct the light more downward than a Linear CPF spiral light would, the fact the ATS screens are angled in, means they will STILL get great light coverage if the light source is directly from Above. Not only that, I wont have to BUILD the fixture or modify it in anyway to sell to customers. The lamps/fixture itself, will be UL listed and safe and probably drop shipped from supplier.

    Since I am building the rest of it, I want to simplfy the process as much as possible, these will be WAY more easy for me to build than my skimmers were.. heheh

    The Spots are really only needed when you want to direct the light for a vertical screen from the sides, in this case the more diffused and UN directed the light source the better. Plus, linear lights are smaller cheaper, and will not be as exposed to the water/mist/creep that the spots are getting over time due to the fact they will not protrude AS much into the trough since the base/bulbs are usually shorter. Which really makes this design even more simple, just using regular spiral type cf bulbs that fire in all directions. I just wanted to use these for a bit since I Just PAID for them and they were NEW! ahahha

    Quote Originally Posted by kcress
    Also I think your 1" drain is a disaster waiting to happen. You should consider a larger one or possibly a second one that is dry and only comes into service once the other is plugged - possibly both.
    Well its something to consider for production models. In my case my Scrump is powered by my two overflow drain lines which are protected by a pair of my CJStandpipes in the overflow, which are protected due to the design utilizing a bell housing around the drain line, which only measure 1/8" gap around the pipe, so nothing large enough (snails, debris) can even get by those housings to allow them to go down into the drain lines into trough. Whats MORE worrisome is the SLOTS clogging! Unlikely they would all get it completely, but they must be maintained and cleaned regularily. Having two sets helps. . Powering it with overflows works for me because of my pipes, But not everyone would have my pipes installed so possibly TWO drain lines protected with coarse foam, and or one larger one would be better, or even a real mini CJStandpipe installed on the trough drain line.. mmmm....

  10. #10

    Join Date
    Sep 2009
    Posts
    81

    Re: New Design "Victory Scrubber Scrump"

    SantaMonica Nice. Looks similar to Broder's

    [color=#000080] Thanks SM, Im pretty happy with it, I looked at his design and thread when he posted a link on my "See Scrubber" he gets great growth and has a good solid build, it's very similar in some ways, except his design is much larger (I was aiming for under sump compact like yours) his also uses the mesh hanging down on each side in sheets dangling vertically, the end result and design are very similar to his, that is true..

    But to be honest It was YOUR dual light trough ATS that inspired the trough idea [/color], [color=#000080] I just was looking for a way to light it from ABOVE with a SINGLE light source(s), so actually its a Hybrid of your design and also Broder's. Also I was inspired by and kinda liked that other guy routestomarket's idea for the dual Horizontal Scrubber and was looking for a way to somehow build a semi horizonatal screen method, and be able use ALL of the screen area, and the V setup did it [/color]

    Correct. But remember it's getting half the light. A vertical has two lights, one on each side, so each side gets all the power of one light. With yours, there is just one light, that is shared by two screens. So with yours you'll need to double the wattage in the center (goal = 1w per gallon)

    [color=#0000B0] As for the lights, I'm not sure what you mean by "one light" if you mean one light "source" than I agree. But I Actually have TWO spotlights in the trough, 2x 23W/90W Equivalent which is 180W total light wattage there, about 50W actual CFL watts. My system is about 100Ga total, so doubling it using 4 ea linear CPFL, as Broder did, should do it for me too. For the proto I have already decided (as Kcress pointed out too) that the simple non reflector/spotlights linear CPF bulbs would be more efficient light source with this design, as they can fire in all directions. (including side to side) It will work better than the setup I have now, until I can locate an affordable Single T5 HO 4 bulb fixture to bundle with it.

    Lighting it from above, was my goal with this design, being able to use ONE SINGLE 4 bulb HO T5 fixture mounted above it, would give the Scrump a VERY low profile while getting good light spread and W/GA.

    Broder's method uses 4 Linear 45W bulbs which seem to work great for him, I will do the same mod to my Reptile light in the short run. Since my screens are also to the sides of the light source as well, not just under/infront of them like a Vertical design, with they V design they are only partially UNDER them

    So, Using those linear vs Spots makes more sense (as I also already noted in my posts above). Right now I have the two spots pointed towards each other so the get pretty good coverage and growth has been fine so far IMHO, as I think that trough refracts a lot of light off the water below and inside the trough itself to some degree. The spots are pretty close to the screens too.

    What I would like to find is a 4 Bulb T5 HO 24" Fixture that is affordable I could bundle it with the SCRUMP kit. I have found a few, but they aint cheap! On the other hand, Its hard to justify spending $200.00 on a T 5 HO sump light on the proto when I can mod that Reptile light for under 20$ including lights to prove concept

    Anyone who has a good suggestion for 24" T5 4 bulb HO fixture thats affordable, I am open to it[/color]

+ Reply to Thread
Page 1 of 4 1234 LastLast

Thread Information

Users Browsing this Thread

There are currently 1 users browsing this thread. (0 members and 1 guests)

Posting Permissions

  • You may not post new threads
  • You may not post replies
  • You may not post attachments
  • You may not edit your posts